


Introduction: The Pivotal Role of Rubber in Diverse Industries
Rubber’s unparalleled combination of elasticity, resilience, and durability has cemented its status as a cornerstone material across countless sectors. It’s the silent workhorse in our daily lives—from the tires that keep cars on the road and the seals that prevent industrial leaks to the shoe soles that cushion every step and the precision components in life-saving medical devices. What makes this vast array of rubber products possible? The answer lies in specialized rubber molding and forming processes. These techniques don’t just shape rubber into usable forms; they directly dictate a product’s performance, longevity, and consistency. As industries demand more complex designs, higher performance standards, and cost-effective production, rubber molding methods have evolved rapidly—each with unique strengths and use cases. For manufacturers, choosing the right process isn’t just a technical decision; it’s the key to delivering products that meet market needs.
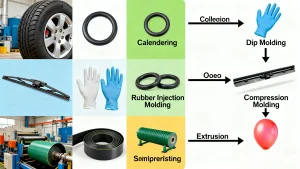
[Suggested Image: A collaged infographic showing common rubber products (tires, O-rings, gloves, medical components) with subtle labels linking them to their respective molding processes. Place at the top of the introduction section to visually connect rubber’s ubiquity to molding techniques.]
1. Compression Molding: The Venerable Pillar of Rubber Molding
1.1 Principle and Process Flow
Compression molding is the backbone of traditional rubber manufacturing—reliable, straightforward, and time-tested. Here’s how it works: First, a precise amount of uncured rubber compound (called a “blank” or “preform”) is cut or shaped to match the general size of the final part. This blank is then placed into a heated mold cavity (typically made of steel or aluminum). The mold’s top half (platen) closes tightly, applying both high temperature (usually 150–200°C) and pressure (10–50 MPa). The heat triggers vulcanization—a chemical reaction that cures the rubber—while pressure forces the material to fill every nook of the cavity. Once curing is complete (timing varies by rubber type and part thickness), the mold opens, and the finished part is removed.
[Suggested Image: A step-by-step diagram of compression molding: 1) Uncured rubber blank placed in mold cavity; 2) Mold closing and applying heat/pressure; 3) Vulcanization process; 4) Mold opening and part removal. Label key components (mold cavity, platen, rubber blank). Place after the “Principle and Process Flow” subheading.]
1.2 Characteristics and Applications
What makes compression molding a go-to for manufacturers? Its versatility—it handles everything from simple flat gaskets to complex parts with undercuts. Tooling and equipment costs are also lower compared to advanced methods, making it ideal for small-to-medium production runs. That said, it has tradeoffs: cycle times are slower (since each part requires manual loading/unloading), and excess rubber (called “flash”) often forms around the part, needing post-production trimming.
Common applications include O-rings for plumbing, vibration mounts for heavy machinery, gaskets for industrial pipes, and rubber feet for electronics. It’s also used for custom parts where low tooling costs outweigh the need for ultra-fast production.
2. Transfer Molding: A Bridge between Traditional and Advanced Techniques
2.1 Operational Mechanism
Transfer molding blends the best of compression and injection molding, solving some of the former’s limitations. The process starts with a rubber blank placed in a separate, heated chamber called a “pot” (located above the mold cavity). A plunger then pushes down on the blank, forcing the molten rubber through small channels (called “sprue” and “runners”) into the closed mold cavity. Once the rubber fills the cavity and vulcanizes, the mold opens, and the part is removed—along with the leftover rubber in the pot and channels (which can sometimes be recycled).
This controlled flow ensures the rubber reaches even the smallest details of the mold, making it perfect for parts with tight tolerances or embedded metal inserts (like rubber-coated bolts).
[Suggested Image: A cross-sectional diagram of a transfer molding setup, labeling the pot, plunger, sprue, runners, mold cavity, and embedded metal insert. Highlight the flow path of molten rubber from the pot to the cavity. Place after the “Operational Mechanism” subheading.]
2.2 Advantages and Drawbacks
Transfer molding’s biggest wins are higher dimensional accuracy and less flash than compression molding—since the rubber is forced into a closed cavity rather than compressed in an open one. It also handles complex designs (like parts with multiple holes or inserts) more reliably. However, it comes with higher costs: the mold is more complex (due to the pot and channels), and material waste is greater (from the sprue/runners). Initial investment in equipment is also steeper than compression molding, so it’s best suited for production runs where precision justifies the extra expense.
3. Injection Molding: Precision and Efficiency Redefined
3.1 The Heart of the Process – The Injection Molding Machine
When it comes to high-volume, precision rubber production, the rubber Injection Molding machine is the star. Unlike compression or transfer molding, this machine automates nearly every step, making it a workhorse for mass manufacturing. A typical rubber Injection Molding machine has three core components:
- Heated Barrel: Uncured rubber pellets or compound are fed into the barrel, where rotating screws (or plungers) melt and mix the material to a uniform, flowable state.
- Injection Unit: Once the rubber is plasticized, the unit injects it into the mold cavity at extremely high pressure (50–200 MPa)—ensuring it fills even the finest details.
- Clamping Unit: This holds the two halves of the mold tightly closed during injection and curing. The clamping force must match the injection pressure to prevent the mold from opening (which would cause flash or misshapen parts).
Modern Injection Molding machines also include controls for temperature, pressure, and cycle time—allowing for consistent, repeatable production.
[Suggested Image: A detailed photograph or 3D rendering of a rubber Injection Molding machine, labeling the heated barrel, injection unit, clamping unit, mold, and control panel. Add a small inset showing the screw inside the heated barrel. Place at the start of the “Injection Molding” section to highlight the machine’s role.]
3.2 Process and Distinguishing Features
Rubber Injection Molding follows a seamless, automated cycle:
- Feeding: Rubber compound is loaded into the machine’s hopper and fed into the heated barrel.
- Plasticization: The barrel’s screw melts and mixes the rubber, controlling temperature to avoid premature curing.
- Injection: The molten rubber is pushed through a nozzle into the closed mold cavity at high pressure.
- Curing (Vulcanization): The mold is kept heated to cure the rubber—cycle times here are shorter than compression molding (often 30 seconds to 5 minutes).
- Ejection: Once cured, the clamping unit opens, and ejector pins push the finished part out.
The biggest advantages? Speed (ideal for high-volume runs), consistency (minimal variation between parts), and low flash (since the mold stays closed during injection). It also eliminates the need for pre-shaped blanks, cutting down on material preparation time.
[Suggested Image: A simplified flow chart of rubber Injection Molding, with icons representing each step (feeding → plasticization → injection → curing → ejection). Add short notes on key benefits (e.g., “No pre-shaped blanks needed” under feeding). Place after the “Process and Distinguishing Features” subheading.]
3.3 Wide-Ranging Applications
Thanks to its precision and efficiency, rubber Injection Molding is used across critical industries:
- Automotive: Wiper blade seals, engine mounts, bushings, and door weatherstripping (where consistency is vital for performance).
- Medical: Sterile components like syringe gaskets, catheter tips, and implantable rubber parts (the process’s low contamination risk meets medical standards).
- Industrial: Large seals for pumps, valves, and hydraulic systems (high pressure ensures parts handle heavy use).
- Consumer Goods: Toothbrush grips, toy components, and appliance gaskets (high volume keeps costs low).
4. Extusion: The Art of Continuous Production
4.1 The Extrusion Principle Unveiled
Extrusion is all about continuous, uniform production—perfect for parts with a consistent cross-section (like tubes, hoses, or profiles). Here’s how it works: Uncured rubber is fed into a heated extruder (a long barrel with a rotating screw). The screw pushes the rubber forward, melting and mixing it as it goes. At the end of the barrel, the rubber is forced through a custom-shaped die (e.g., a circular die for tubes, a rectangular die for strips). As the rubber exits the die, it retains the die’s shape—then moves to a cooling or vulcanization unit (often a water bath or oven) to cure. The result? A long, continuous length of rubber that can be cut to desired sizes.
[Suggested Image: A side-view diagram of an extruder, showing the hopper, heated barrel, rotating screw, die, and vulcanization bath. Highlight the rubber’s path from feeding to extrusion, and show a close-up of the die shaping the rubber into a tube. Place after the “Extrusion Principle Unveiled” subheading.]
4.2 Process Characteristics and Limitations
Extrusion’s greatest strength is efficiency: it can produce thousands of meters of product per day, making it ideal for high-volume needs. It’s also cost-effective for simple shapes, as die tooling is less complex than molding tools. However, it has constraints: it only works for parts with a constant cross-section (no complex curves or undercuts). Additionally, post-vulcanization adds time and cost—unlike injection molding, where curing happens in the mold. Common extruded products include garden hoses, automotive fuel lines, weatherstripping for windows, and rubber profiles for construction (e.g., door seals).
5. Calendering: Shaping Sheets and Creating Composites
5.1 The Basics of Calendering
Calendering is the go-to process for making thin rubber sheets or coating fabrics with rubber to create composites. It uses a series of heated, rotating rolls (usually 2–5 rolls arranged in a vertical or horizontal stack). Here’s the process: Uncured rubber is fed between the first set of rolls, which squeeze and stretch it into a thin, uniform layer. As the rubber passes through subsequent rolls, the gap between the rolls is adjusted to achieve the exact thickness (from 0.1 mm to several millimeters). For composite materials (like tire plies), fabric is fed into the rolls along with the rubber—pressing the rubber into the fabric to create a reinforced sheet. The finished product is then cooled and cured.
[Suggested Image: A top-down diagram of a 4-roll calendering machine, showing rubber and fabric being fed into the first roll gap, then passing through successive rolls to form a thin composite sheet. Label the rolls, rubber feed, fabric feed, and finished sheet. Add a measurement marker (e.g., “0.5 mm thickness”) to highlight precision. Place after the “Basics of Calendering” subheading.]
5.2 Key Application Areas
Calendering is critical in industries that rely on thin, strong rubber materials:
- Tire Manufacturing: The primary use—calendering produces “carcass plies” (reinforced fabric-rubber sheets that form the tire’s structure) and “tread plies” (the rubber layer that contacts the road).
- Conveyor Belts: Rubber-coated fabric sheets created via calendering form the flexible, durable belts used in factories and mines.
- Waterproofing: Thick rubber sheets are used for roofing, pond liners, and basement waterproofing—calendering ensures uniform thickness for reliable protection.
- Textiles: Rubber-coated fabrics for raincoats, wetsuits, and industrial aprons are made using calendering.
6. Dipping / Dip Molding: Mastering Thin – Film Production
6.1 The Dipping Process in Detail
Dip molding is the gold standard for creating thin, flexible rubber products—think products with walls as thin as 0.1 mm. The process starts with a mold (often made of ceramic, metal, or plastic) shaped like the final product (e.g., a glove mold). The mold is first cleaned and treated with a release agent (to help the rubber separate later). Next, it’s dipped into a tank of liquid rubber compound (usually latex or a synthetic rubber solution). The mold is left to soak for a set time—longer soaking creates thicker walls. After dipping, the mold is lifted out, and excess rubber drips off. It’s then dried (to remove solvents) and cured (via heat or chemical treatment) to harden the rubber. Finally, the mold is peeled or rolled to remove the finished thin-film product.
[Suggested Image: A sequence of photos showing the dip molding process: 1) Glove-shaped ceramic mold; 2) Mold dipped into liquid latex; 3) Mold lifted with latex coating; 4) Drying/curing oven; 5) Finished glove removed from the mold. Label each step clearly. Place after the “Dipping Process in Detail” subheading.]
6.2 Ideal Product Types for Dip Molding
Dip molding’s strength lies in its ability to create thin, seamless products—making it indispensable for:
- Medical Industry: Surgical gloves, examination gloves, finger cots, and catheter balloons (thin walls allow for flexibility and sensitivity, while seamless design prevents contamination).
- Protective Gear: Disposable gloves for food handling, chemical-resistant gloves for lab work, and dust masks with rubber seals.
- Consumer Goods: Balloons, toy squeeze balls, and waterproof covers for small electronics (thin rubber keeps products lightweight).
7. Casting: Forging Intricate and Detailed Parts
7.1 The Casting Principle for Liquid Polymers
Casting is designed for complex, detailed parts that other processes (like extrusion or compression molding) can’t handle. Unlike solid rubber compounds used in other methods, casting uses liquid polymers—most commonly liquid silicone rubber (LSR) or polyurethane (PU). The process is simple but precise: First, a mold (often made of silicone, aluminum, or resin) is created with the exact shape of the desired part—including tiny details like logos or texture. The liquid rubber is then mixed with a curing agent (to trigger hardening) and poured or injected into the mold. The mold is left to sit (at room temperature or in a heated oven, depending on the polymer) until the rubber cures and solidifies. Once cured, the mold is opened, and the part is removed—no trimming needed, since the liquid fills every detail without excess.
[Suggested Image: A close-up photo of liquid silicone rubber being poured into a detailed mold (e.g., a medical component mold with tiny grooves). Add an inset showing the finished part next to the mold, highlighting how the rubber replicates every detail. Place after the “Casting Principle for Liquid Polymers” subheading.]
7.2 Specialties and Applications
Casting’s ability to capture fine details and complex geometries makes it ideal for:
- Medical Components: Custom-shaped seals for diagnostic devices, flexible connectors for medical tubing, and implantable parts (LSR is biocompatible, meeting medical standards).
- Art and Prototyping: Reproductions of sculptures, decorative elements, and prototypes (casting allows for quick mold creation and small-batch production).
- Industrial Parts: Solid tires for forklifts or small machinery (thick, durable parts with no seams), and custom gaskets for irregularly shaped equipment.
- Consumer Electronics: Rubber keypads for remote controls, waterproof seals for smartwatches, and vibration-dampening feet for laptops (detailed shapes fit tight device spaces).
Conclusion
The world of rubber molding and forming is far from static—it’s a dynamic field driven by innovation and industry demand. From the reliability of compression molding to the precision of rubber Injection Molding (powered by advanced rubber Injection Molding machines), each process has carved out a vital niche. As technology advances, we’re seeing exciting shifts: more automated Injection Molding machines that reduce waste, new liquid polymers for casting that meet stricter environmental standards, and extrusion methods that can create more complex cross-sections.
For manufacturers, the key to success lies in matching the right process to the product: choosing compression molding for low-volume gaskets, rubber Injection Molding for high-volume medical parts, and casting for intricate prototypes. By staying ahead of these trends, the rubber industry will continue to shape the products that keep our world running—one well-molded part at a time.