


Rubber injection molding has transformed how we manufacture rubber components, offering a precise, efficient, and scalable solution for high-quality parts. By injecting liquid rubber into custom molds—where it cures and takes shape—this method adapts to countless shapes, sizes, and performance needs across industries.
From automotive seals to medical devices and consumer goods, rubber injection molding delivers the durability, consistency, and cost-effectiveness modern industries demand. In this guide, we’ll break down everything you need to know: how the process works, top materials, key equipment, real-world applications, and why it outperforms other molding methods.
1. What Is Rubber Injection Molding? Definition & Core Principles
The Basics of Rubber Injection Molding
Rubber injection molding is a manufacturing technique that produces high-precision rubber parts by forcing liquid rubber into a mold cavity under intense pressure. The process starts with formulating raw rubber—often blended with additives like vulcanizing agents or fillers to boost flexibility, heat resistance, or durability. This compound is then injected into a custom mold, where heat cures (vulcanizes) and cools it into a solid, finished part.
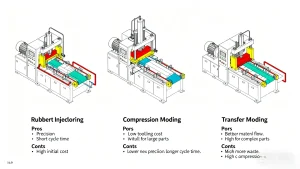
Unlike compression or transfer molding, rubber injection molding uses specialized machinery to control material flow. This ensures every mold cavity fills uniformly, resulting in consistent parts with tight tolerances—critical for applications like medical devices or automotive components.
How a Rubber Injection Molding Machine Operates
Every rubber injection molding machine has four core components working in sync to produce reliable parts:
-
Injection Unit: Feeds, melts, and injects rubber. It includes a hopper for raw material, a screw to mix and heat the rubber, and a nozzle that delivers the liquid compound into the mold.
-
Clamping Unit: Secures the mold during injection and curing. It applies steady pressure to keep the mold closed, preventing leaks and ensuring proper part formation.
-
Mold: A custom tool (usually steel or aluminum) shaped to the exact specifications of the final part. Mold design directly impacts dimensions, surface finish, and functionality.
-
Heating & Cooling Systems: Heat cures (vulcanizes) the rubber to set its properties, while cooling systems solidify the part for easy removal. Both are critical for consistent results.
Why Rubber Injection Molding Beats Other Methods
Compared to compression or transfer molding, injection molding offers clear advantages for modern manufacturing:
-
Superior Precision: Tight tolerances and uniform filling mean every part matches design specs—ideal for high-performance applications.
-
High Efficiency: Minimal waste (thanks to precise material dosing) and fast cycle times make it cost-effective for large production runs.
-
Design Flexibility: Creates complex geometries, intricate details, and custom shapes that other methods can’t match.
-
Faster Production: Automated processes and shorter curing cycles reduce lead times, even for high-volume orders.
2. Top Rubber Materials for Injection Molding
Common Rubber Types & Their Uses
The right rubber material makes or breaks a part’s performance. Here are the most widely used options in injection molding, each tailored to specific applications:
-
EPDM (Ethylene Propylene Diene Monomer): Resists weather, ozone, and aging—perfect for outdoor and automotive parts like window seals, gaskets, and hoses.
-
Nitrile Rubber (NBR): Stands up to oils, fuels, and chemicals. Used in automotive fuel system components, industrial seals, and oil-resistant gaskets.
-
Silicone Rubber: Handles extreme temperatures (high and low) and maintains flexibility. Ideal for medical devices, kitchenware, and electrical insulators.
-
Neoprene Rubber: Balances resistance to heat, oils, and abrasion. Used in industrial belts, gaskets, and protective gear.
How to Choose the Right Rubber
Selecting rubber starts with matching material properties to your application’s needs. Key factors to consider:
-
Temperature Range: Silicone tolerates higher heat than nitrile; EPDM handles cold better than neoprene.
-
Chemical Exposure: Use nitrile for oil contact; EPDM for water or ozone exposure.
-
Mechanical Needs: Tensile strength (for load-bearing parts) or tear resistance (for flexible components).
-
Regulatory Requirements: Medical or food applications need FDA-approved materials like medical-grade silicone.
3. Key Components of Rubber Injection Molding Equipment
Each part of the molding system plays a critical role in quality and efficiency. Beyond the core machine components, these details matter:
Injection Unit: The “Feeder” of the Process
The injection unit’s job is to ensure consistent material flow. The screw doesn’t just melt rubber—it mixes additives evenly, eliminating inconsistencies. Nozzle design (e.g., heated vs. cold) depends on the rubber type; silicone, for example, often uses heated nozzles to maintain flow.
Clamping Unit: Stability for Perfect Parts
Clamping force is measured in tons, and the right amount depends on mold size and rubber type. Too little force causes leaks (called “flash”); too much can damage the mold. Modern machines use hydraulic or electric clamping for precise control.
Mold Design & Tooling: The Blueprint for Success
Molds are the most expensive upfront cost, but a well-designed tool reduces defects like air pockets or incomplete fills. Tooling maintenance—such as cleaning and polishing—extends mold life and preserves part quality.
Heating & Cooling: Controlling Cure and Cycle Time
Vulcanization temperatures vary by rubber: silicone cures at 350–400°F (175–200°C), while EPDM uses 320–360°F (160–180°C). Cooling systems (often water channels in the mold) speed up solidification—cutting cycle times without sacrificing part strength.
4. The Rubber Injection Molding Process: Step-by-Step
Rubber injection molding is a repeatable, controlled sequence. Each step is optimized to ensure consistency and quality:
Step 1: Material Preparation
Raw rubber is mixed with additives (vulcanizing agents, colorants, fillers) to meet performance specs. This compound is often pre-formed into pellets or sheets for easy feeding into the machine’s hopper.
Step 2: Injection into the Mold
The machine heats the rubber to a molten state (called “melt flow”) and injects it into the mold cavity at high pressure (500–3,000 psi). Pressure ensures the rubber fills every detail of the mold, from tiny grooves to complex shapes.
Step 3: Vulcanization (Curing)
The mold is held at a constant temperature to trigger vulcanization—a chemical reaction that cross-links rubber molecules. This step gives the part its final properties (strength, flexibility, heat resistance). Cure time ranges from 10 seconds to several minutes, depending on part thickness and rubber type.
Step 4: Cooling
After curing, the mold is cooled to solidify the part. Rapid, uniform cooling prevents warping or cracking. For thick parts, cooling may take longer to ensure the core solidifies fully.
Step 5: Ejection & Removal
The clamping unit opens the mold, and ejector pins push the finished part out. Most modern machines use automated ejection to speed up production and reduce human error.
Step 6: Post-Molding Processing
Parts may undergo trimming (to remove excess flash), surface finishing (e.g., polishing), or quality checks (dimensional testing, leak checks). Medical parts often require sterilization at this stage.
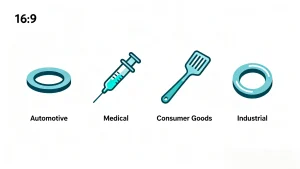
5. Applications of Injection Molded Rubber Parts
Rubber injection molding’s versatility makes it indispensable across industries. Here are the most common uses:
Automotive Industry
Automotive parts face extreme temperatures, chemicals, and vibration—making injection-molded rubber ideal. Key components include:
-
Engine gaskets and oil seals (NBR or EPDM)
-
Window and door seals (EPDM for weather resistance)
-
Vibration dampers (neoprene or silicone)
Medical & Healthcare
Medical applications demand precision and biocompatibility. Injection molding produces FDA-approved parts like:
-
Syringe seals and IV connector gaskets (medical-grade silicone)
-
Fluid transport tubing (silicone or nitrile)
-
Device grips and ergonomic components
Consumer Goods
Everyday products rely on injection-molded rubber for comfort and durability:
-
Kitchen tools (silicone spatulas, appliance seals)
-
Sports equipment (grips for weights, shoe soles)
-
Electronics (phone cases, headphone cushions)
Industrial Applications
Industrial machinery needs rubber parts that resist wear, chemicals, and heavy use. Common uses include:
-
O-rings and valve seals (nitrile or EPDM)
-
Conveyor belt rollers and gaskets
-
Pump and hose components (neoprene)
Conclusion
Rubber injection molding stands out as a top choice for manufacturing because it balances precision, efficiency, and flexibility; by using specialized machinery, custom molds, and tailored rubber materials, it delivers parts that meet the strictest standards—whether for automotive engines, medical devices, or consumer products—offering higher precision and consistency than compression or transfer molding, requiring careful matching of rubber type to temperature, chemical, and regulatory needs, and leveraging automated processes and fast cycle times to stay cost-effective for both small batches and large-scale production, making it a reliable and scalable solution for bringing high-quality rubber products to market.